Share
Pin
Tweet
Send
Share
Send
According to the Uzbek recipe, roast cake can be baked not only in the tandoor, but also in a conventional oven. In order to make it airy, with a fried crust and elastic texture, I use several secrets. I am pleased to share them with you.
Cooking time: 2 hours +.
Servings Per Container: 3 pieces.

Essential Ingredients
To prepare three medium cakes, you will need:
- wheat flour - 600 g;
- warm water - 430 - 450 ml .;
- dry quick-acting yeast - 5 g. (teaspoon or half a small bag);
- refined oil - 2 tablespoons;
- sugar - 1 tablespoon;
- rock salt - 1 teaspoon;
- sesame seeds - optionally;
- chicken egg - 1 piece.

Necessary equipment
In the process of preparing and baking, the following equipment will come in handy:
- standard baking sheet according to the size of the oven;
- sieve for sifting flour;
- whisk or tablespoon;
- frying pan for sesame roasting;
- a bowl of at least 3 liters for the dough;
- a container of water;
- silicone brush for lubricating the tortillas.
Starting to cook, immediately turn on the oven. We’ll put dough near it to make it better.
Step-by-step recipe for making cakes in the oven
1. To prepare the dough in a bowl, mix the sugar, yeast, 2 tablespoons of flour, pour half the water (200 ml). Cover with a towel and remove to a warm place until air bubbles form on the surface.

2. When the texture of the sponge became porous - this means that the active fermentation process has begun. At this point, add the remaining volume of water (230 - 250 ml.), Vegetable oil, add salt to the dough and add flour.

3. Knead the dough with a spoon, and then with your hands until smooth. The texture should not be too thick and not dense. For cakes with an elastic texture, soft and flexible dough is required.

5. The top of the bowl can be tightened with cling film or covered with a towel. In order for the structure of the cakes to turn out to be airy, the mass must be near the oven for at least 60 minutes.

6. While the dough is coming to fry sesame seeds. After it cools down, it can be transferred to a plastic bag and rolled on top several times with a rolling pin to violate the integrity of the seeds. Then sesame will reveal its aroma more strongly.

7. When the dough has risen, remove the towel from it and form cakes.

8. Since the dough is liquid, it sticks to your hands. Cold water will help to slightly ease the process of baking formation (periodically wet hands in it).

9. Using tacks, remove the preheated sheet from the oven and place it on the stove with the bottom side out. Spread the dough on a hot, dry surface.
On a note. In the process of baking, I put the first cake not on a hot, but on a warm baking sheet. It was necessary to remove it from the surface with a knife. I laid out the following cakes on a well-heated sheet. In this case, the baked goods were readily taken off very readily, and not even crumbs remained on the sheet.

10. The cake is formed so that the edges are more magnificent, and in the middle there was a dent. So that the middle does not rise during the baking process, you need to make a few punctures with a fork in it. Grease the surface with a beaten egg, sprinkle with sesame seeds and put in the oven for 4 - 5 minutes at 200 degrees. For the first time, the raw tortilla should be on top of the pan.

11. When the baking surface is fried to the sheet, turn it over with the back side. Let’s get browned.

12. The finished bread is removed from the sheet with a sharp large knife and put to cool on a board or wire rack.

13. We cover the hot pastries with a towel to prevent the formation of a hard crust.

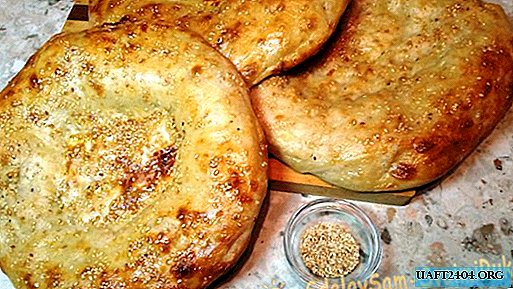
The cake is as fragrant and beautiful as from a tandoor. It is stored for at least three days, remaining elastic, porous and tasty.

Watch the video tutorial
You can see in detail how to correctly form the dough on a baking sheet and turn it over, in the video.
Share
Pin
Tweet
Send
Share
Send