Share
Pin
Tweet
Send
Share
Send
Today we will disassemble the modem from webstream
![](http://img.uaft2404.org/img/sdela-2019/dsl.jpg)
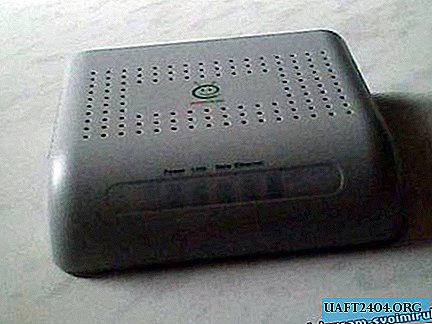
Here is a general view of the modem.
![](http://img.uaft2404.org/img/sdela-2019/dsl-2.jpg)
Turn the modem over.
![](http://img.uaft2404.org/img/sdela-2019/dsl-3.jpg)
Remove the rubber bands that cover the bolts.
![](http://img.uaft2404.org/img/sdela-2019/dsl-4.jpg)
Turn off the bolts.
![](http://img.uaft2404.org/img/sdela-2019/dsl-5.jpg)
And remove the cover. Now we have the opportunity to consider the modem stuffing!
![](http://img.uaft2404.org/img/sdela-2019/dsl-6.jpg)
Voooooooot she!
![](http://img.uaft2404.org/img/sdela-2019/dsl-7.jpg)
Here is the first Realteck processor.
![](http://img.uaft2404.org/img/sdela-2019/dsl-8.jpg)
And here is the second, only smaller Realtek processor.
![](http://img.uaft2404.org/img/sdela-2019/dsl-9.jpg)
Capacitors, coils, resistors, diodes, etc.
![](http://img.uaft2404.org/img/sdela-2019/dsl-10.jpg)
And these are the first 3 green LEDs, and one such white little RGB.
![](http://img.uaft2404.org/img/sdela-2019/dsl-11.jpg)
Here is the board itself without a cover.
![](http://img.uaft2404.org/img/sdela-2019/dsl-12.jpg)
This is the port for the line.
![](http://img.uaft2404.org/img/sdela-2019/dsl-13.jpg)
This is an Ethernet port.
![](http://img.uaft2404.org/img/sdela-2019/dsl-14.jpg)
And this is a reset button, a charging slot and a switch.
![](http://img.uaft2404.org/img/sdela-2019/dsl-15.jpg)
The board is upside down, there are fewer tracks on it.
And a couple of photos
![](http://img.uaft2404.org/img/sdela-2019/dsl-16.jpg)
![](http://img.uaft2404.org/img/sdela-2019/dsl-17.jpg)
![](http://img.uaft2404.org/img/sdela-2019/dsl-18.jpg)
All! :-)
Share
Pin
Tweet
Send
Share
Send