Share
Pin
Tweet
Send
Share
Send
On the Internet, I found a suitable outline for the number one, enlarged it to the size I needed using the Paint program (available on the computer in standard programs) and printed it. The figure was printed on several sheets. I glued these sheets with glue-pencil and cut out the number.
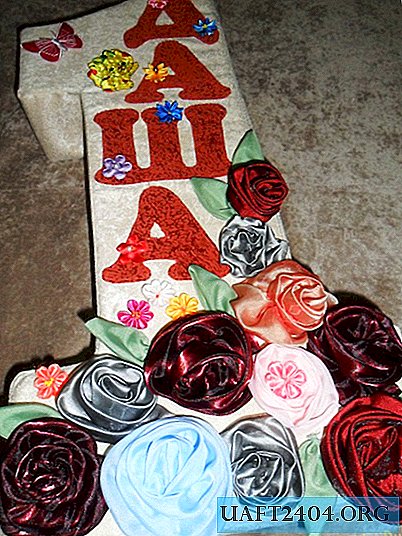
Then she also found beautiful letters on the Internet. I only needed three, since my granddaughter's name is Dasha. Letters also increased on a computer to a height of 11 cm, printed and cut out.

I laid out letters on a paper pattern to see how all this would look, and decided to lengthen the figure a little. To do this, I inserted a small piece in the middle of the figure.


The figure turned out to be 62 cm high and 17 cm wide. The preparatory work is over, we need to think about what we will continue to make our figure from. I decided to sew it, fill it with something and decorate it with flowers.

We select materials:
1. A dense fabric of light golden color (I have furniture, but you can also take curtains or just calico) for the base of the figure measuring 62 by 32 cm and for the sidewalls - about 48 by 52 cm,
2. Chintz, matching the color of the main fabric - for the back of the numbers,
3. A dense bright fabric (I also have furniture, but you can use any, but not crumbling) for letters about 25 by 25 cm,
4. Jewelry (flowers made of fabric, leaflets, beads, applications),
5. A filler for a letter (synthetic wool, foam rubber) or maybe something else will come up in the process,
6. Sewing machine, threads matching the main fabric, needle, glue stick and transparent glue "Titan" (who has a glue gun, you can use it).
We start sewing numbers. On the chintz, we lay out the pattern of the figure, pin it with pins and cut it out with an allowance of 1 cm around the entire contour for the seam. We lay out the number from the chintz on the main fabric, pin and cut it out. If you apply the figure from the wrong side, do not forget to turn the pattern in the opposite direction so that the finished figure "looks" correctly.
From the main fabric, we cut 4 strips 12 cm wide and 52 cm long, so that when stitching, we get a strip about 200 cm long (I measured the perimeter of the whole figure, and I got almost 2 meters).


We lay out the letters on the bright fabric, circle their outline and cut it out. We lay out the letters on the number, choosing the best option and leaving a void below to accommodate the flowers. I grease the letters with glue-pencil and glue them to the main fabric so that they do not slip when sewing. Sew letters.


Sew the strips along the side of 12 cm and smooth the seams from the inside. Gently sew the resulting strip around the entire perimeter of the numbers from the main fabric. We sew the beginning and end of the strip, cut off the excess. We make cuts at the corners so that the fabric lies better, and we sew a seam on the front side.


Sew to the strip a digit from chintz (backdrop), previously chipping it at the corners with the strip. If it is supposed to hang a number, you can previously sew a loop on the back. If the figure is standing, then this is not necessary. The backdrop should not be sewn along the entire contour, but leave behind the digits the opening through which the filler will be inserted. If it is foam rubber or synthetic wool, you can leave a small space, but if something is rigid and voluminous, it is better to leave one side not wired from top to bottom of the number.
The resulting product needs to be turned out and straightened at the corners. I kept wondering how to make the volume: foam rubber - the figure will be convex, make the number out of cardboard - messing around for a long time and may get wrinkled. Then a brilliant idea came to my mind: we have polystyrene at work (it comes to the warehouse like packaging). It is in the form of sheets with a thickness of 5 cm. I gave the paper figure to the storekeepers and asked them to cut out two of these units to me. Our men are trouble-free, after half an hour everything was ready, and my joy was endless. It turned out exactly what I needed: voluminous, solid, with a clear contour. In principle, it is not difficult to do this at home, the foam is sold in hardware stores, and you can cut it with a paper knife.


At home, I glued these two numbers and inserted them into the prepared fabric cover, carefully sewn the hole manually. It remains only to decorate our figure.

For decoration, I decided to use different flowers, leaflets, once I tried to make flowers from fabric, so they came in handy. I also have store flowers in stock, leaves of different colors, beads and appliqués.

We beautifully lay it all out on a number and gently glue it with a glue gun or glue "Titan" (you can use any other transparent glue that is used to glue the ceiling tiles). Here we have such a figure. We hang it on the wall to decorate the room. I think that not only my granddaughter will like her, but also all the guests.

Share
Pin
Tweet
Send
Share
Send